
Summary
- When dealing with Dharma ransomware, seek professional assistance to navigate ransom demands and payment concerns.
- Act quickly to minimize downtime and prevent data loss by engaging a professional ransomware recovery service.
- Implement strong security measures to prevent Dharma ransomware attacks, such as multi-factor authentication and regular backups.
- Use reputable decryption tools to recover files encrypted by Dharma ransomware and prevent future infections through software updates and security best practices.
In this article, I will discuss the importance of Dharma Ransomware Recovery & Removal Services.
Ransom Demands and Payment Concerns
When negotiating with cybercriminals for ransom payment: It is important to proceed with caution and avoid making hasty decisions. Consider seeking assistance from professionals who specialize in ransomware recovery and removal services.
When making a payment: Be aware of the risks involved in dealing with cybercriminals. There is no guarantee that paying the ransom will result in the safe return of your files. Additionally, there may be legal implications associated with funding criminal activities.
If you are unsure about how to proceed with ransom demands and payment concerns, seek guidance from experts in cybersecurity. They can provide valuable insights and assistance in navigating the complexities of ransomware attacks and ensuring the security of your data.
Recovery Time from Attack
It is important to act quickly and decisively to minimize downtime and prevent further data loss. Engage a professional ransomware recovery service to assist with the process, as they have the expertise and tools necessary to expedite the recovery process.
Once the ransomware has been removed from your systems, it is essential to conduct a thorough analysis to identify any vulnerabilities that were exploited during the attack. Implementing multi-factor authentication and regular password changes can help prevent future attacks.
Regularly backing up your data to an offsite location can also aid in the recovery process, as it allows you to restore your files without having to pay the ransom. Additionally, investing in robust security software such as Microsoft Defender Antivirus can help protect your systems from future attacks.
By taking proactive measures to secure your systems and data, you can minimize the recovery time from a Dharma ransomware attack and safeguard your business against future threats.
Attack Methods and Victim Targeting
Attack methods used by Dharma ransomware typically involve exploiting vulnerabilities in computer security systems, such as weak passwords or lack of multi-factor authentication. Victims are often targeted through phishing emails or by exploiting remote desktop software vulnerabilities.
If you suspect your system has been infected with Dharma ransomware, immediately disconnect from any network to prevent further spread of the malware. Contact our recovery and removal services to assist in restoring your encrypted files and eliminating the ransomware from your system.
Attackers may use brute-force attacks to gain access to systems, encrypting files and demanding payment in cryptocurrency for their release. It is crucial to implement strong passwords, regularly back up your data, and update your security software to protect against ransomware attacks.
If you are a victim of Dharma ransomware, do not pay the ransom as it does not guarantee the recovery of your files. Our experts can provide assistance in recovering your data and removing the ransomware from your system to prevent future attacks.
Identifying the Infection
If you suspect an infection, run a full scan of your system using Microsoft Defender Antivirus or a reputable malware removal tool. Look for any suspicious processes running in your Task Manager or any unfamiliar programs installed on your machine. Monitor your network traffic for any unusual communication patterns that may indicate a ransomware attack.
Review your email inboxes for any suspicious emails or attachments that could have been the entry point for the ransomware. Check your Microsoft 365 accounts and SharePoint sites for any unauthorized access or changes made by the ransomware.
If you are unable to identify the infection or remove it on your own, seek professional help from Dharma ransomware recovery and removal services. They have the expertise and tools to safely remove the ransomware from your system and recover your encrypted files without paying the ransom.
Varieties of Ransom Notes
- Determine the type of ransom note:
- Look for any text or image-based ransom notes left on the infected device.
- Take note of any contact information or ransom amount provided in the note.
- Identify the ransomware strain:
- Research the specific characteristics of the ransom note to determine the ransomware strain.
- Use online resources or contact cybersecurity experts for assistance.
Encrypted File Extensions and Email Accounts
It is also important to secure your email accounts during this process. Change the passwords for all email accounts linked to the infected system. Make sure to use strong, unique passwords to prevent any further unauthorized access. Consider using a password manager to generate and store complex passwords securely.
Additionally, be cautious of phishing emails that may attempt to steal your credentials or spread ransomware. Verify the authenticity of all emails before clicking on any links or attachments. If in doubt, contact the sender directly through a verified communication channel.
After securing your email accounts, reach out to a professional ransomware recovery service for assistance. They can guide you through the removal process and help restore your encrypted files.
Distribution Tactics
Implementing multi-factor authentication (MFA) for RDP connections can add an extra layer of security against brute-force attacks. Regularly updating software and implementing strong password policies can also help protect against Dharma ransomware attacks. Additionally, restricting user access to sensitive data and regularly backing up important files can mitigate the impact of a potential ransomware infection.
In the event of a Dharma ransomware attack, it is essential to disconnect affected systems from the network immediately to prevent further spread. Contacting a professional ransomware recovery and removal service like Dharma Ransomware Recovery & Removal Services can help mitigate the damage and safely recover encrypted files.
By staying informed about the latest ransomware distribution tactics and implementing proactive security measures, organizations can better defend against Dharma ransomware attacks and protect their valuable data.
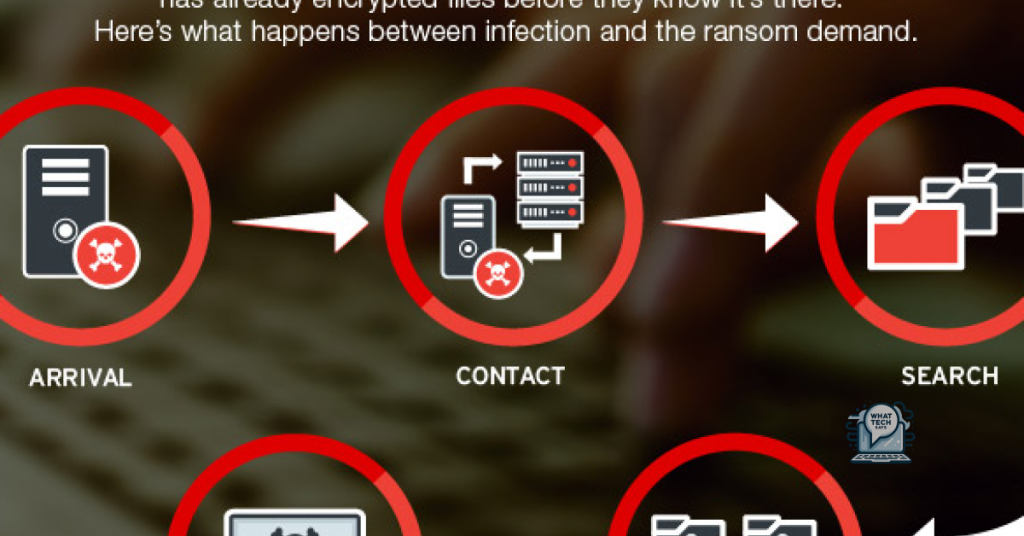
Encryption Process and File Impact
Encryption Process: Dharma ransomware encrypts files using a strong encryption algorithm, making them inaccessible without the decryption key. This process typically targets a wide range of file types, including documents, images, videos, and more.
File Impact: Once encrypted, files will have a new extension added to their names, indicating they are locked. Attempts to open these files will result in an error message or prompt for a decryption key, making them unusable.
Recovery and Removal Services: To recover files affected by Dharma ransomware, it is crucial to first remove the malware from the system using reputable antivirus software. Once removed, data recovery tools or professional services may be needed to restore encrypted files.
Prevention: To prevent future attacks, it is essential to regularly update security software, avoid suspicious links or email attachments, and maintain secure backups of important files. Additionally, implementing strong passwords and multi-factor authentication can add an extra layer of protection against ransomware threats.
Removal of Executable Files
To remove executable files associated with Dharma Ransomware, follow these steps:
First, ensure that all affected devices are disconnected from any network or internet connection to prevent further spread of the ransomware.
Next, locate the executable files related to Dharma Ransomware on the infected devices. Look for suspicious files with unfamiliar file extensions or names.
Once identified, delete the executable files immediately to stop the ransomware from encrypting any more files on the device.
After removing the executable files, run a full scan of the device using reputable antivirus software to ensure that all traces of the ransomware have been eradicated.
It is also recommended to change all passwords and credentials on the affected devices to prevent any future unauthorized access.
Finally, consider implementing additional security measures such as regular software updates, strong password policies, and employee training to prevent future ransomware attacks.
Using a Decryptor Tool
To use a Decryptor Tool for Dharma Ransomware Recovery & Removal Services, follow these steps:
1. Download the Decryptor Tool from a reputable source.
2. Run the tool on the infected computer.
3. Follow the prompts to begin the decryption process.
4. Wait for the tool to decrypt the files affected by the Dharma ransomware.
5. Once the process is complete, ensure that all files have been successfully decrypted.
6. Back up your files to prevent future data loss.
7. Implement security measures to protect your computer from future ransomware attacks.
Using a Decryptor Tool can help recover your files without having to pay the ransom demanded by cybercriminals. It is important to act quickly and efficiently to minimize the impact of the ransomware on your system and data.
Decryption Tools: Availability and Use
Decryption tools are essential in recovering files encrypted by Dharma ransomware. These tools are available online and can assist in decrypting files without paying the ransom.
It is important to use reputable decryption tools to ensure the safety and security of your files. When using decryption tools, always back up your encrypted files before attempting to decrypt them to prevent any potential data loss.
Some popular decryption tools for Dharma ransomware include RakhniDecryptor and Emsisoft Decryptor for Dharma. These tools have been known to successfully decrypt files encrypted by Dharma ransomware.
Before using any decryption tool, make sure to research and verify its legitimacy. Always download decryption tools from trusted sources to avoid installing malware or further compromising your system.
If you are unsure about using decryption tools or need assistance in recovering your files, consider seeking professional ransomware recovery and removal services. These services can help you navigate the decryption process and ensure the safe recovery of your files.
Preventing Future Infections
To prevent future infections after recovering from a Dharma ransomware attack, it is crucial to update all software and operating systems immediately. This includes installing security patches and updates to ensure any vulnerabilities are addressed. Additionally, implement strong password policies across all systems and accounts to prevent unauthorized access.
Regularly back up your data and store it in a secure location to avoid losing important files in the event of another ransomware attack. Consider using a reputable cloud storage service or an external hard drive for backups. Enable multi-factor authentication for all accounts to add an extra layer of security against potential breaches.
Educate your team on cybersecurity best practices and how to recognize phishing emails or suspicious links. Conduct regular security training sessions to keep everyone informed and vigilant against potential threats. Limit user access to sensitive data and monitor network activity for any unusual behavior that could indicate a security breach.
Consider implementing endpoint detection and response solutions to detect and respond to threats in real-time. Stay informed about the latest cybersecurity trends and threat actors to better protect your systems. By taking proactive steps and staying vigilant, you can reduce the risk of future infections and safeguard your organization’s data.
Data Backup Strategies
Implement a regular backup schedule: Set up automatic backups on a regular basis to ensure that your data is constantly being saved. This will minimize the risk of losing important information in case of a ransomware attack.
Utilize cloud storage: Consider using cloud storage services such as Microsoft 365 or SharePoint to store your backups. This will provide an extra layer of security and accessibility to your data.
Encrypt your backups: Before storing your backups, make sure to encrypt them to prevent unauthorized access. This will add an extra level of protection to your data in case of a security breach.
Test your backups: Regularly test your backups to ensure that they are working properly. This will help you identify any issues before they become critical during a ransomware attack.
Ransomware Recovery Services Overview
Our Dharma Ransomware Recovery & Removal Services are designed to efficiently and effectively assist individuals and organizations in recovering from ransomware attacks. Our team of experts specializes in the removal of Dharma ransomware and restoring encrypted files back to their original state.
Our recovery process begins with a thorough assessment of the ransomware attack, identifying the extent of the damage and the specific variant of Dharma ransomware that has infiltrated the system. This allows us to develop a targeted strategy for recovery.
Once the assessment is complete, our team will work diligently to remove the Dharma ransomware from the affected systems using advanced tools and techniques. We will then restore encrypted files using decryption keys whenever possible, ensuring that your data is safely recovered.
In addition to recovery and removal services, we also provide guidance on enhancing your cybersecurity measures to prevent future ransomware attacks. By implementing best practices for computer security and user training, you can minimize the risk of falling victim to ransomware in the future.
Our Dharma Ransomware Recovery & Removal Services are backed by years of experience and a proven track record of successful recoveries. Don’t let ransomware hold your data hostage – contact us today for expert assistance in recovering from Dharma ransomware attacks.