

Summary
- CHKDSK is a crucial tool for fixing hard drive issues in Windows 7
- Regularly running CHKDSK can prevent potential issues from escalating
- CHKDSK can be initiated via File Explorer, Command Prompt, and with Installation Media
- Troubleshooting common CHKDSK issues and resolving errors with Safe Mode can help maintain optimal PC performance
In this article, I will discuss the benefits of using the ScanDisk utility for fixing hard drive issues on Windows 7.
Understanding CHKDSK
CHKDSK is a crucial tool for fixing hard drive issues in Windows 7. It helps to scan and repair problems with the file system and disk storage. To run CHKDSK, open Command Prompt by typing “cmd” in the Start menu and right-clicking on Command Prompt to run it as an administrator.
Next, type “chkdsk C:” (replace “C:” with the letter of your hard drive) and press Enter. CHKDSK will then scan your hard drive for any errors and fix them if possible. It may take some time to complete, depending on the size of your hard drive and the extent of the issues.
If CHKDSK finds and fixes errors, it will display a message indicating the results of the scan. If it finds bad sectors or other serious problems, it may prompt you to schedule a disk check on the next boot.
The Right Time for Disk Checks
- Regular Disk Checks:
- Perform disk checks regularly to prevent any potential issues from escalating.
- Schedule disk checks during off-peak hours to minimize disruption.
- After System Crashes:
- If your system crashes unexpectedly, run a disk check to identify any underlying issues.
- Use the ScanDisk utility to scan and repair any disk errors that may have contributed to the crash.
- Before Installing Updates:
- Before installing system updates or new software, run a disk check to ensure the integrity of your hard drive.
- Identifying and repairing disk errors beforehand can prevent potential issues during the installation process.
Initiating CHKDSK via File Explorer
To initiate CHKDSK via File Explorer, first open File Explorer by double-clicking on the icon on your desktop or by pressing the Windows key + E. Next, right-click on the drive you want to scan for errors.
Click on Properties from the context menu that appears. In the Properties dialog box, go to the Tools tab and under Error checking, click on the Check button.
A dialog box will appear asking if you want to check the disk the next time you restart your computer. Click on Schedule disk check and then restart your computer to begin the CHKDSK process.
CHKDSK will scan your hard drive for errors and attempt to fix any issues it finds. This tool is useful for maintaining the health of your hard drive and ensuring that your data remains safe.
Initiating CHKDSK via Command Prompt
To initiate CHKDSK via Command Prompt, follow these steps:
1. Press the Windows key + R to open the Run dialog box.
2. Type cmd and press Enter to open Command Prompt.
3. In Command Prompt, type chkdsk C: /f /r and press Enter. Replace “C” with the letter of the drive you want to scan.
4. You will see a message asking if you want to schedule the scan for the next time you restart your computer. Type Y and press Enter.
5. Restart your computer to allow CHKDSK to scan and fix any errors on the hard drive.
Running CHKDSK with Installation Media
To run CHKDSK with Installation Media on a Windows 7 hard drive, you will need to follow a few simple steps. First, insert the Windows installation media into your computer and boot from it. Once you reach the installation screen, press Shift + F10 to open a command prompt.
Next, type chkdsk C: /f /r /x and hit Enter. This command will scan and repair any errors on your hard drive. Make sure to replace “C:” with the drive letter where Windows is installed.
After CHKDSK has completed its scan, restart your computer and remove the installation media. Your Windows 7 hard drive should now be free from any errors that were detected during the scan.
Remember to regularly run CHKDSK to maintain the health and speed of your hard drive. It is an essential tool for error detection and correction, especially in cases of hard disk drive failure.
Changing Scheduled Disk Checks
To change scheduled disk checks on Windows 7, open the Command Prompt as an administrator. Type chkntfs /t: followed by the drive letter you want to change. For example, to change drive C, type chkntfs /t:
c. Next, type the number of seconds you want to delay the disk check, such as chkntfs /t: c 10 to delay for 10 seconds. Press Enter to apply the changes.
To view the current settings, type chkntfs c: for the drive you want to check. This will show the current delay time in seconds. To disable automatic disk checks, type chkntfs /x c:
for the drive you want to disable. This will prevent the disk check from running at startup for that specific drive.
Key CHKDSK Commands
| Command | Description |
|---|---|
| CHKDSK C: | Checks the C: drive for errors and fixes them |
| CHKDSK /F | Fixes errors on the disk without scanning for bad sectors |
| CHKDSK /R | Locates bad sectors and recovers readable information |
| CHKDSK /V | Displays the name of each file in every directory |
Troubleshooting Common CHKDSK Issues
If CHKDSK encounters issues while running on your Windows 7 hard drive, here are some common troubleshooting steps you can take:
First, try running CHKDSK with the /f parameter to fix any errors found on the drive. Open a Command Prompt window with administrative privileges by typing “cmd” in the Start menu search bar, right-clicking on “cmd.exe,” and selecting “Run as administrator.”
If the drive is a solid-state drive (SSD), consider running CHKDSK with the /r parameter instead, as this will scan for and attempt to repair bad sectors on the drive.
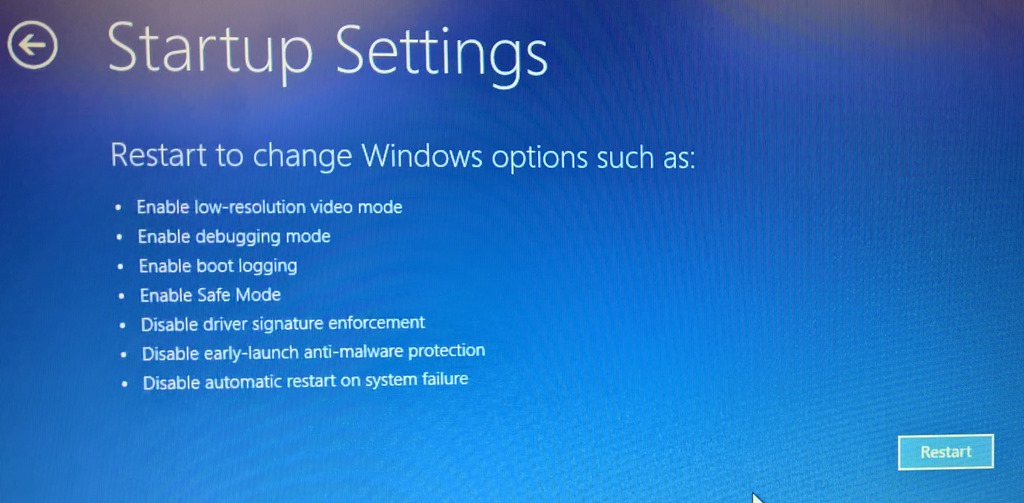
If CHKDSK fails to complete or encounters errors, you may need to run the utility from the Windows Recovery Environment. To do this, boot your computer from a Windows installation disc or USB flash drive, select “Repair your computer,” and open a Command Prompt window.
If you suspect a hardware issue with your hard drive, such as a failing disk, consider using a third-party disk diagnostic tool to further investigate the problem.
After running CHKDSK and addressing any issues found, it’s a good idea to back up your important data to prevent data loss in case of a hard disk drive failure.
Resolving Errors with Safe Mode
To resolve errors with Safe Mode in Windows 7 using the ScanDisk utility, follow these steps:
Step 1: Restart your computer and press the F8 key repeatedly before the Windows logo appears to access the Advanced Boot Options menu.
Step 2: Select “Safe Mode” from the menu and press Enter to boot into Safe Mode.
Step 3: Once in Safe Mode, open the Command Prompt by searching for “cmd” in the Start menu.
Step 4: Type “chkdsk /f” in the Command Prompt and press Enter to run the ScanDisk utility on your hard drive.
In Safe Mode, the utility can scan and fix any errors on your hard drive that may be causing issues with your Windows 7 operating system. This can help improve the overall performance and stability of your computer. After the scan is complete, restart your computer normally to see if the errors have been resolved. If you continue to experience issues, consider seeking further assistance from a professional or the manufacturer of your computer.
Preventing Data Corruption
To prevent data corruption on your Windows 7 hard drive, it is essential to regularly run the ScanDisk utility. This tool can help detect and fix errors on your hard drive before they lead to more serious issues.
First, open the Command Prompt by typing “cmd” in the search bar and selecting “Run as administrator.” This will give you the necessary permissions to run the ScanDisk utility effectively.
Next, type “chkdsk /f C:” in the Command Prompt window and press Enter. This command will scan your C: drive for any errors and automatically fix them.
It is important to note that running ScanDisk may require a restart of your computer, so be prepared to do so when prompted. This will ensure that the utility can properly fix any errors it finds.
By regularly running the ScanDisk utility on your Windows 7 hard drive, you can prevent data corruption and maintain the health of your computer’s storage system.
Maintaining Optimal PC Performance
To maintain optimal PC performance on your Windows 7 hard drive, it’s important to regularly use the ScanDisk utility. This tool can help fix any errors or issues that may be affecting your computer’s performance.
First, open the Command Prompt by typing “cmd” in the search bar and selecting the appropriate option. This will allow you to access the ScanDisk utility and run a scan on your hard drive.
Once the Command Prompt is open, type “chkdsk /f” and press Enter. This command will initiate a scan of your hard drive and fix any errors that are found during the process.
It’s recommended to schedule regular scans using the ScanDisk utility to ensure that your hard drive is functioning properly. This can help prevent any issues that may arise from bad sectors or corrupted files on your hard drive.
By using the ScanDisk utility on your Windows 7 hard drive, you can help maintain optimal PC performance and ensure that your computer runs smoothly and efficiently.
F.A.Q.
How do I run a ScanDisk on Windows 7?
To run a ScanDisk on Windows 7, you can right-click on the drive C: and select Properties. Then, go to the Tools tab and click on Check Now under Error-Checking. Make sure to select both options to automatically fix file system errors and scan for bad sectors.
How do I scan a disk in Windows 7?
To scan a disk in Windows 7, you will need to right-click the Start Windows icon, open Windows Explorer, navigate to Computer, right-click the drive you want to check, click Properties, go to the Tools tab, and click the Check now button.
Where is disk Utility on Windows 7?
Disk Utility on Windows 7 can be found by clicking on Manage, then selecting Disk Management from the Computer Management window that opens. This will display all the drives detected by Windows.
How to repair Windows 7 with chkdsk?
To repair Windows 7 with chkdsk, you can run CHKDSK before booting up your computer. Simply start your computer, press and hold F8 until you see the Advanced boot options window, then select Repair your computer and hit Enter.