
In the digital realm, where uncertainty and unexpected events loom, safeguarding precious data becomes paramount. Whether it’s for protection against system crashes, accidental deletions, or even the desire to switch to a new device seamlessly, having a reliable backup and restore strategy is essential for Windows 10 users. This article dives into the magic of preserving and recovering your valuable files, ensuring peace of mind in the face of technological uncertainties.
Creating and Restoring Backups Using System Image Tool
To create and restore backups using the System Image Tool in Windows 10, follow these steps:
1. Open the Control Panel and search for “Backup and Restore” or “File History” in the search box.
2. Click on “Backup and Restore” or “File History” from the results.
3. In the Backup and Restore or File History window, click on “Create a system image” or “Create a system image backup.”
4. Choose the location where you want to save the backup files. This can be an external storage device such as a USB flash drive or a network location.
5. Select the drives or file folders that you want to include in the backup. By default, Windows will select the system drive (usually the C: drive) and any other connected drives.
6. Click on “Next” and review your backup configurations.
7. Click on “Start backup” or “Start” to begin the backup process. This may take some time depending on the size of your files and the speed of your storage device.
8. To restore your system using the backup, open the Control Panel and search for “Backup and Restore” or “File History” in the search box.
9. Click on “Backup and Restore” or “File History” from the results.
10. Click on “Restore my files” or “Restore files from a current backup.”
11. Follow the instructions to select the backup location and the files or folders that you want to restore.
12. Click on “Restore” to start the restore process.
Remember to regularly create backups to protect your files and system from data loss, malware attacks, or other issues.
Setting Up Storage Devices for Backup on Windows 10
- Connect the storage device to your computer.
- Locate an available USB port on your computer.
- Insert the USB cable into the USB port on your computer and the other end into the storage device.
- Open the Windows 10 Backup and Restore tool.
- Click on the “Start” button located at the bottom left corner of your screen.
- Type “Backup and Restore” into the search bar and press Enter.
- Click on the “Backup and Restore (Windows 7)” option from the search results.
- Select the storage device as the backup destination.
- Click on the “Set up backup” button on the Backup and Restore window.
- Choose the storage device you connected in step 1 from the list of available devices.
- Click Next to proceed.
- Choose the files and folders to include in the backup.
- Select the Let me choose option and click Next.
- Check the boxes next to the files and folders you want to include in the backup.

- Click Next to continue.
- Configure backup settings.
- Choose how often you want to create a backup by selecting an option from the dropdown menu.
- Choose a specific time for the backup to occur by clicking on the Change schedule button.
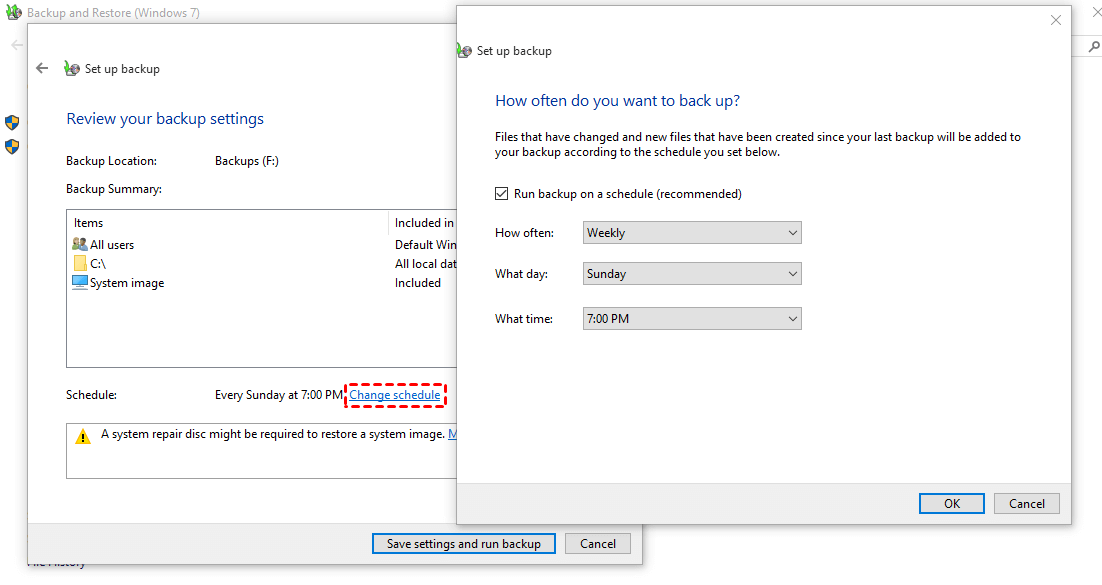
- Specify any additional backup settings such as file size limitations or encryption options.
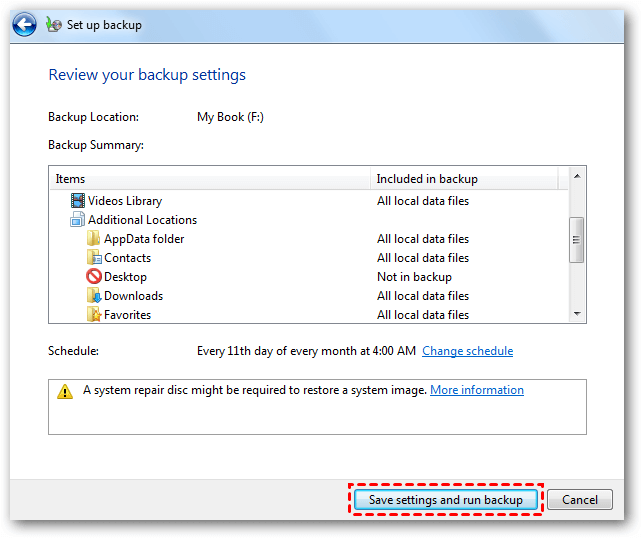
- Review the backup settings and start the backup process.
- Review the summary of the backup settings to ensure they are correct.
- Click on the Save settings and run backup button to start the backup process.
Backing Up and Restoring Files in Windows 10 and Windows 11
To backup and restore files in Windows 10 and Windows 11, you have a few options to choose from. One way is to use the built-in Backup and Restore or File History feature.
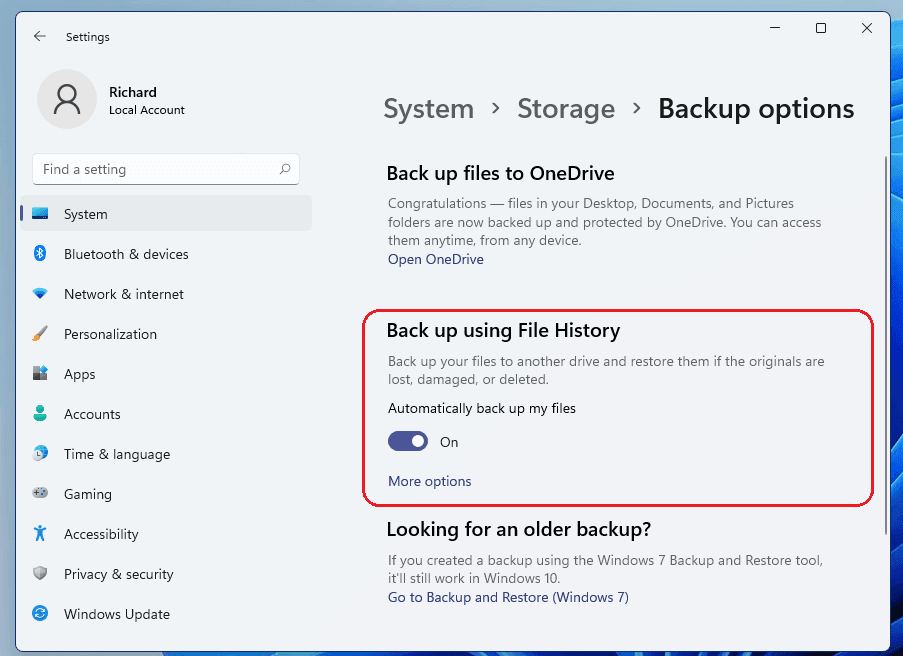
To use File History, go to Settings, click on Update & Security, then select Backup. From there, you can turn on File History and choose a backup drive. This will automatically create copies of your files, such as documents, music, and pictures, and store them in a backup folder. You can also customize the backup settings and choose how often files are copied.
Another option is to use the System Image Backup tool to create a complete backup of your PC. This tool creates an exact copy of your system, including all files, programs, and configurations. You can access this tool by searching for “Backup” in the taskbar search and selecting “Backup settings.” From there, click on Go to Backup and Restore (Windows 7) and select Create a system image.
Remember to regularly backup your files to protect against data loss, malware attacks, or system issues. By having a solid backup and recovery plan in place, you can easily restore your files and get back to work without any trouble.
python

import os

import subprocess
def create_windows_backup(source_path, destination_path):
# Check if the source and destination paths exist
if not os.path.exists(source_path):
print("Source path does not exist.")
return
if not os.path.exists(destination_path):
print("Destination path does not exist.")
return
try:
# Construct the robocopy command
robocopy_cmd = ['robocopy', source_path, destination_path, '/e', '/mir']
# Execute the robocopy command
subprocess.run(robocopy_cmd, check=True)
print("Windows 10 backup created successfully.")
except subprocess.CalledProcessError as e:
print("An error occurred while creating the backup:", e)
# Usage example
create_windows_backup('C:\\Data', 'D:\\Backup')
This code snippet demonstrates a function `create_windows_backup` that takes in a source path (the folder to be backed up) and a destination path (the location where the backup will be stored). It uses `robocopy` with the `/e` and `/mir` flags to copy all files and subdirectories, including empty ones, and to mirror the source directory structure in the destination.
Please make sure to modify the `source_path` and `destination_path` parameters according to your specific requirements before running the code.
Restoring Backups and Files on Windows 10
Restoring Backups and Files on Windows 10
This article provides step-by-step instructions on how to backup and restore files on Windows 10. Follow the guide below to ensure your data is protected and easily recoverable.
| Action | Description |
|---|---|
| 1. Open File History | Click on the Start menu, then go to Settings > Update & Security > Backup > Add a drive. Select an external drive or network location to save your backups. |
| 2. Enable File History | Toggle the “Automatically back up my files” option to On. Windows 10 will now automatically back up your files to the selected location. |
| 3. Restore Files | If you need to restore files, open File History again and click on “Restore files from a current backup”. Browse the backup location and select the files you want to restore. |
| 4. System Restore | In case you need to restore your entire system to a previous state, you can use the System Restore feature. Open the Start menu, search for “System Restore”, and follow the on-screen instructions. |
| 5. Backup and Restore with Third-Party Software | If you prefer a more comprehensive backup solution, you can use third-party software such as Acronis True Image or EaseUS Todo Backup. These tools offer advanced features and flexibility in managing your backups and restoring files. |
By following these steps, you can ensure that your important files are regularly backed up and easily recoverable in case of any unexpected data loss or system issues.