
In this guide, I will provide a quick overview of how to locate USB Debugging on Android devices.
Enabling USB Debugging on Android
To enable USB debugging on your Android device, follow these steps:
1. Connect your Android device to your computer using a USB cable.
2. On your Android device, go to the Settings menu.
3. Scroll down and tap on “About phone” or “About device.”
4. Look for the “Build number” or “Build version” option and tap on it seven times. This will enable developer options on your device.
5. Go back to the main Settings menu and now you should see a new option called “Developer options.” Tap on it.
6. In the Developer options menu, scroll down and find the “USB debugging” option.
7. Toggle the switch next to “USB debugging” to enable it. You may be prompted to confirm this action.
8. Once USB debugging is enabled, you can now connect your Android device to your computer and use Android Debug Bridge (ADB) or Media Transfer Protocol (MTP) for various tasks such as transferring files or debugging your apps.
Remember to disable USB debugging when you’re done to ensure the security of your device.
If you encounter any issues or need further assistance, refer to the troubleshooting resources provided by your device manufacturer or visit the support section of the Android website.
Troubleshooting USB Debugging Issues
If you are experiencing USB debugging issues on your Android device, you may be wondering where to find the USB debugging option. Follow the steps below to locate it:
1. Connect your Android device to your computer using a USB cable.
2. On your Android device, go to the “Settings” menu.
3. Scroll down and tap on “About phone” or “About tablet.”
4. Look for the “Build number” or “Build version” option and tap on it seven times. This will enable developer options on your device.
5. Go back to the main “Settings” menu and you should now see a new option called “Developer options.”
6. Tap on “Developer options” and scroll down to find the “USB debugging” option.
7. Toggle the switch to enable USB debugging.
Once USB debugging is enabled, you can use it for various purposes, such as installing custom ROMs, debugging apps, or transferring data between your Android device and computer.
If you are still having trouble with USB debugging, there are a few troubleshooting steps you can try:
1. Make sure you have the necessary USB drivers installed on your computer. You can usually find these drivers on the manufacturer’s website.
2. Try using a different USB cable or port on your computer. Sometimes, faulty cables or ports can cause connectivity issues.
3. Restart both your Android device and computer, then try reconnecting them.
4. If you are using a Windows computer, try switching between different USB connection modes, such as MTP (Media Transfer Protocol) or PTP (Picture Transfer Protocol).
Setting up Java SE SDK and Android SDK for Debugging
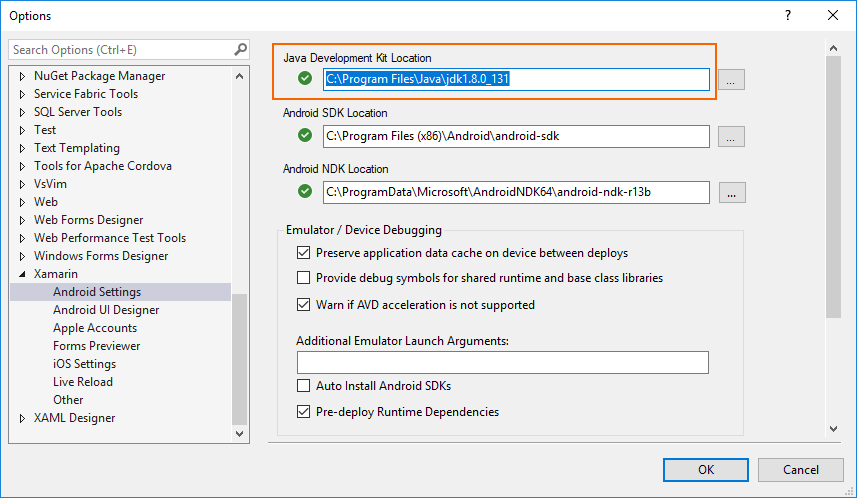
To set up Java SE SDK and Android SDK for debugging on your Android device, follow these steps:
1. First, ensure that you have Java SE SDK installed on your personal computer. You can download it from the Java SE Development Kit website.
2. Next, download the Android SDK from the Android Developer website. This SDK includes the necessary tools for debugging Android devices.
3. Once downloaded, extract the Android SDK to a location of your choice on your computer.
4. Connect your Android device to your computer using a USB cable. Make sure that USB debugging is enabled on your device.
5. On your Android device, go to “Settings” and scroll down to “System” or “Developer options.” If “Developer options” is not visible, go to “About phone” and tap on “Build number” seven times to enable it.
6. In “Developer options,” enable USB debugging. You may also need to enable “USB debugging (Security settings)” for certain devices.
7. Now, open the Android SDK folder on your computer and locate the “platform-tools” folder.
8. Open a command prompt or terminal window and navigate to the “platform-tools” folder using the “cd” command.
9. In the command prompt or terminal, enter the command “adb devices” to check if your device is recognized. You should see your device listed.
10. You can now use the Android Debug Bridge (ADB) to debug your Android device using various commands and tools.
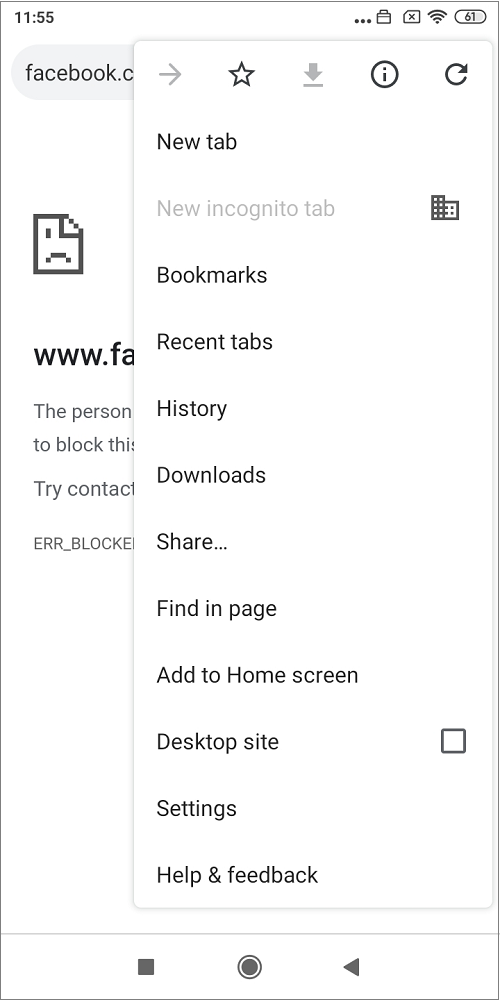
Configuring Google Chrome for Android Debugging
| Configuring Google Chrome for Android Debugging | |
|---|---|
| Article Title: | Where to Find USB Debugging on Android |
| Step | Description |
| 1 | Ensure your Android device is connected to your computer via USB cable. |
| 2 | Open Google Chrome on your computer. |
| 3 | Type “chrome://inspect” into the address bar and press Enter. |
| 4 | In the “Devices” section, click on the “Port forwarding” button. |
| 5 | Click on “Add rule” to create a new port forwarding rule. |
| 6 | In the “Device port” field, enter the port number used by your Android app for debugging (e.g., 8080). |
| 7 | In the “Local address” field, enter “localhost:port” where “port” is the same port number used in the previous step (e.g., localhost:8080). |
| 8 | Click on the “Done” button to save the port forwarding rule. |
| 9 | On your Android device, open the “Settings” app. |
| 10 | Scroll down and tap on “Developer options”. If you don’t see this option, go to “About phone” and tap on “Build number” multiple times until you see a message indicating that you have become a developer. |
| 11 | Toggle the “USB debugging” option to enable it. |
| 12 | Go back to Google Chrome on your computer and you should see your Android device listed under the “Devices” section. |
| 13 | Click on the “Inspect” button next to your device to open the Chrome DevTools for debugging. |
| 14 | You can now debug your Android app using the various tools provided by Chrome DevTools. |