
Summary
- Download desired .pat file from a reliable source
- Add the file path to the support file search path in AutoCAD options
- Use the Hatch command to select and apply custom hatch patterns
- Experiment with scale, angle, and properties to enhance design and readability
In this article, I will discuss the process of installing custom hatch patterns in AutoCAD.
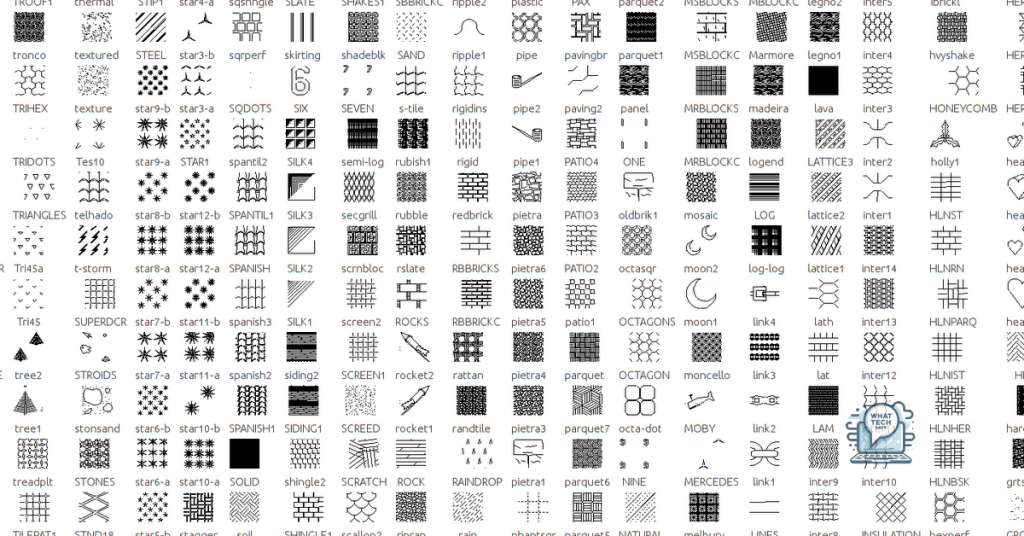
Understanding Hatch Patterns
In AutoCAD, hatch patterns are used to represent different materials or textures in architectural and technical drawings. To install custom hatch patterns, follow these steps:
1. Download the desired hatch pattern file (.pat) from a reliable source.
2. Open AutoCAD and go to the “Options” menu.
3. In the “Files” tab, under “Support File Search Path,” add the folder where the .pat file is saved.
4. Close and reopen AutoCAD to load the new hatch patterns.
5. To apply a custom hatch pattern, use the “Hatch” command and select the desired pattern from the pattern list.
6. Adjust the scale, angle, and other properties of the hatch pattern as needed.
Custom hatch patterns can enhance the design and readability of your drawings, allowing you to accurately represent materials like wood, concrete, brick, vegetation, and more. Experiment with different patterns to achieve the desired effect.
Managing Preloaded and Custom Patterns

- Locate the installation folder for AutoCAD custom hatch patterns
- Ensure that the custom patterns are saved in the correct format
- Open the hatch patterns manager in AutoCAD
- Click on the “Custom” tab to view all custom patterns
- Use the “Add” button to import new custom patterns
- Use the “Remove” button to delete unwanted custom patterns
Locating and Importing .pat Files
To locate and import .pat files for custom hatch patterns in AutoCAD, you will first need to find the desired .pat file on your computer. Once you have located the file, you can import it into AutoCAD by following these steps:
1. Open AutoCAD and navigate to the ribbon at the top of the screen.
2. Select the “Express Tools” tab.
3. In the “Express Tools” tab, locate the “Custom Hatch” option.
4. Click on “Custom Hatch” and a dialog box will appear.
5. In the dialog box, click on the “Import” button.
6. Locate the .pat file on your computer and select it.
7. Click “Open” to import the custom hatch pattern into AutoCAD.
The Role of Support File Search Path
The support file search path plays a crucial role in the installation of custom hatch patterns in AutoCAD. To ensure the custom hatch patterns are accessible within the software, it is important to set the correct search path.
When installing custom hatch patterns, make sure to include the file path to the directory where the patterns are stored. This will allow AutoCAD to locate and use the custom hatch patterns as needed.
To set the support file search path in AutoCAD, go to the Options dialog box by typing “OPTIONS” in the command line. Then, navigate to the “Files” tab and add the directory path where the custom hatch patterns are located.
By correctly configuring the support file search path, you can easily access and use your custom hatch patterns in AutoCAD for your architectural or technical drawings. This simple step can streamline your workflow and enhance your design process.
F.A.Q.
How do I open a PAT file in AutoCAD?
To open a PAT file in AutoCAD, you need to first place the file in the support folder. Then, you can access it by starting the hatch command, selecting settings, and clicking on the swatch box in the custom tab to locate and use your PAT file.
What is Acad Pat file?
Acad Pat file is a CAD file used by AutoCAD software to provide hatch patterns for textures/fillings of areas in drawn objects.
How do I run a .PAT file?
To run a .PAT file, you can use software like GIMP or Photopea. In Photopea, simply open the file through File > Open, then access the patterns via Edit > Preset Manager > Pattern.