
Welcome to the ultimate guide on sharing files in Windows 7 LAN! In this article, we will delve into the step-by-step process of effortlessly sharing files with other devices connected to your local network. Whether you’re a tech-savvy enthusiast or a beginner, get ready to unlock the power of seamless file sharing in Windows 7 LAN. Let’s dive in!
Setting up file sharing on Windows 7 through LAN
To set up file sharing on Windows 7 through LAN, follow these steps:
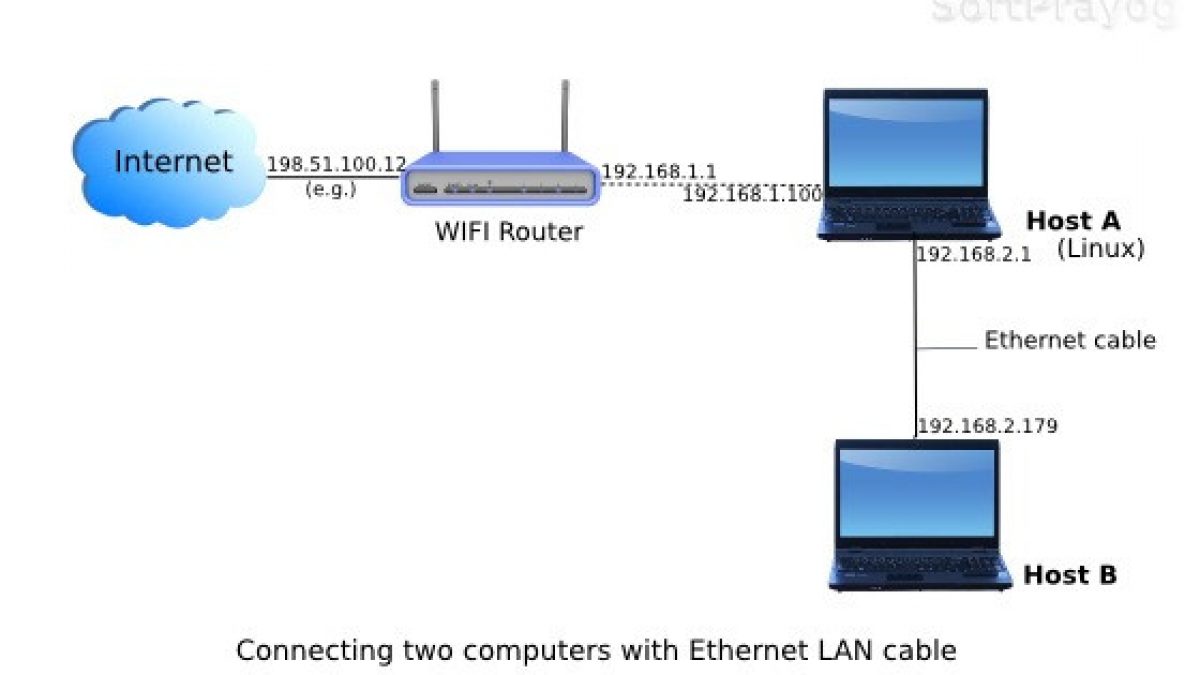
1. Connect both computers using an Ethernet cable.
2. On the computer with the files you want to share, create a shared folder by right-clicking on it and selecting “Properties.” Go to the “Sharing” tab and click “Advanced Sharing.” Enable “Share this folder” and set permissions if necessary.
3. On the other computer, open “File Explorer” and click on “Network” in the sidebar.
4. Locate the shared folder from the first computer, right-click on it, and select “Map network drive.”
5. Choose a drive letter and tick the “Reconnect at sign-in” box if desired. Click “Finish” to complete the setup.
Now, the two computers can easily share files over the LAN.
Benefits and stepwise guide for transferring files via Ethernet cable
- Connect the Ethernet cable to both computers
- Locate an Ethernet cable and connect one end to the Ethernet port on the first computer.
- Connect the other end of the Ethernet cable to the Ethernet port on the second computer.
- Configure network settings
- On the first computer, open the “Control Panel” by clicking on the “Start” button and selecting “Control Panel”.
- Click on “Network and Internet”, then “Network and Sharing Center”.
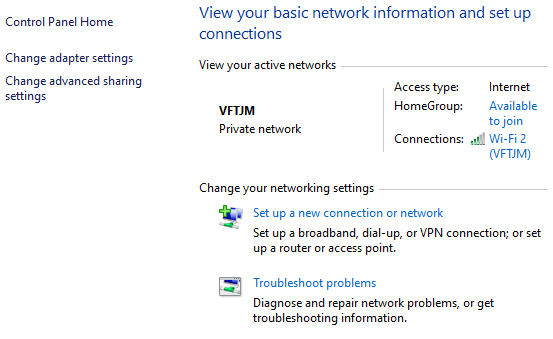
- Click on “Change adapter settings” on the left side of the window.
- Right-click on the Ethernet connection and select “Properties”.
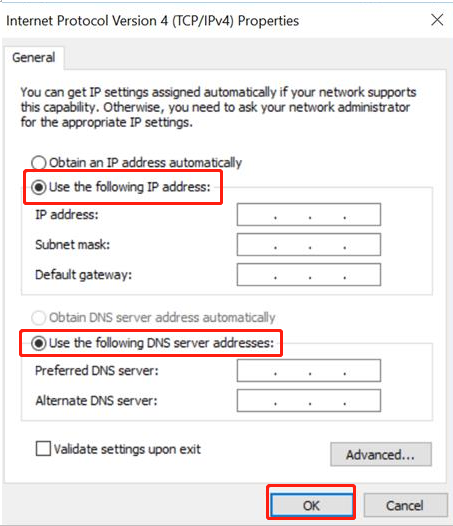
- In the “Networking” tab, select “Internet Protocol Version 4 (TCP/IPv4)” and click on “Properties”.
- Select the option “Use the following IP address” and enter the IP address and subnet mask provided by your network administrator.
- Repeat the same steps on the second computer, ensuring that the IP address and subnet mask are different from the first computer.
- Enable file sharing
- On the first computer, open the “Control Panel” and click on “Network and Internet”, then “Network and Sharing Center”.
- Click on “Change advanced sharing settings” on the left side of the window.
- Under the “Home or Work” profile, select “Turn on file and printer sharing”.
- Click on “Save changes”.
- Repeat the same steps on the second computer.
- Access shared files
- On the first computer, open “File Explorer” by pressing the “Windows” key and “E” simultaneously.
- Click on “Network” in the left navigation pane.

- Double-click on the second computer’s name to access its shared files.
- You can now copy, move, or delete files between the two computers using the Ethernet connection.
Common problems and resolutions for file sharing on Windows 7
To share files on Windows 7 LAN, you may encounter some common problems. Here are a few resolutions to help you overcome these issues:
1. Ensure that both computers are connected to the same network, either via a LAN cable or a WiFi network.
2. Check that file sharing is enabled on both computers. Go to Control Panel, select Network and Sharing Center, and click on Change advanced sharing settings. Enable file and printer sharing.
3. Make sure that the necessary permissions are set for the shared folders. Right-click on the folder you want to share, select Properties, go to the Sharing tab, and click on Advanced Sharing. Grant the appropriate permissions for other users or the network.
4. If you’re having trouble connecting two computers, try using direct IP addresses. Press Windows key + R, type ‘cmd,’ and press Enter. In the command prompt, type ‘ipconfig’ and note down the IPv4 address of the computer you want to connect to. On the other computer, press Windows key + R, type ‘\\
5. If you’re experiencing issues with internet connection sharing, ensure that the host computer has internet access and that the network adapter is correctly configured for sharing. Go to Control Panel, select Network and Sharing Center, click on Change adapter settings, right-click on the adapter you want to share, and select Properties. Go to the Sharing tab and enable ‘Allow other network users to connect through this computer’s internet connection.’
Additional support resources for sharing files on Windows 7
| Resource Name | Description | Link |
|---|---|---|
| Windows 7 File Sharing Guide | A comprehensive guide on how to share files and folders on Windows 7 LAN. | Click here |
| Windows 7 Homegroup Setup | Step-by-step instructions to set up a Homegroup for easy file sharing between Windows 7 computers. | Click here |
| Network and Sharing Center Overview | An overview of the Network and Sharing Center in Windows 7, which provides options for file sharing and network discovery. | Click here |
| Windows 7 File and Printer Sharing | A Microsoft support article explaining how to enable file and printer sharing on Windows 7 computers. | Click here |
| Windows 7 Network Troubleshooter | A built-in troubleshooting tool in Windows 7 to diagnose and fix common network and file sharing issues. | Click here |