
Summary
- Razer Cortex boosts FPS and optimizes performance for a smoother gaming experience
- Offers exclusive deals, rewards, and discounts for users
- Provides precise FPS prediction and aesthetic tuning capabilities
- User-friendly interface with comprehensive optimization features and privacy policy
In this article, we will explore how Razer Cortex boosts FPS and optimizes performance.
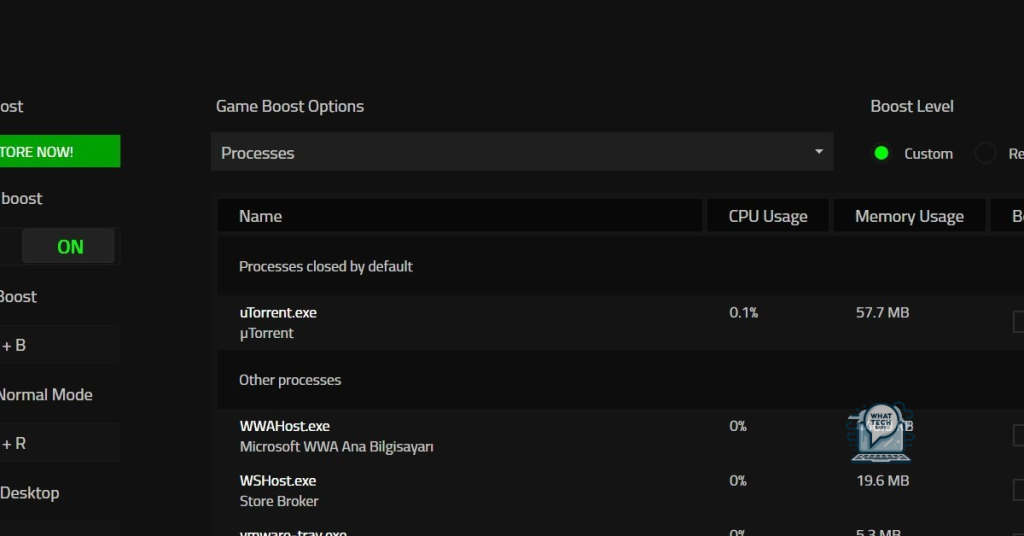
Game Launching and Boosting Features
With Razer Cortex, you can boost your game’s frame rate and reduce lag, ultimately improving your overall gameplay. The software optimizes your system by freeing up resources and prioritizing gaming performance. The intuitive interface makes it easy to navigate and customize settings to fit your preferences.
Whether you’re a casual gamer or a hardcore enthusiast, Razer Cortex has the tools you need to enhance your gaming experience. Download the app today and see the difference it can make in your gameplay. Experience smoother graphics, faster load times, and overall improved performance with Razer Cortex.
System Optimization and Performance Enhancement
| Feature | Description |
|---|---|
| Boost FPS | Razer Cortex helps boost your system’s FPS (Frames Per Second) for a smoother gaming experience. |
| Optimizes Performance | Razer Cortex optimizes your system’s performance by freeing up system resources and closing unnecessary background processes. |
| Game Booster | Razer Cortex includes a Game Booster feature that prioritizes gaming performance by allocating resources to the game you are playing. |
| System Cleanup | Razer Cortex helps clean up junk files and temporary files to free up storage space and improve system performance. |
Exclusive Deals and Rewards
- Special discounts on Razer products
- Early access to new game releases
- Rewards points for every purchase
- Exclusive access to beta testing opportunities
- Priority customer support for Cortex users
Precision FPS Prediction and Aesthetic Tuning
Razer Cortex Boosts FPS and Optimizes Performance
Razer Cortex offers precise FPS prediction and aesthetic tuning capabilities to enhance your gaming experience. By leveraging machine learning algorithms, Razer Cortex is able to predict FPS performance with accuracy. Additionally, it optimizes your system’s performance to ensure smooth gameplay.
The tool is compatible with Windows 7, 8, 10, and Android operating systems, making it versatile for a wide range of devices. Whether you’re gaming on a mobile device or a personal computer, Razer Cortex can boost your FPS and enhance your gaming experience.
With Razer Cortex, you can fine-tune your settings to achieve the best possible performance. Its intuitive interface allows for easy customization, ensuring that you get the most out of your gaming gear. Download Razer Cortex today and take your gaming to the next level.
User Interface and Support Overview
Razer Cortex offers a user-friendly interface that allows for easy navigation and customization. Users can easily access features such as boosting FPS and optimizing performance with just a few clicks.
The support overview provided by Razer Cortex is comprehensive, offering users access to FAQs, troubleshooting guides, and customer support options. This ensures that users can get help whenever they encounter any issues while using the software.
Additionally, Razer Cortex is compatible with various operating systems, including Windows 7, Windows 8, and Windows 10. It also has a mobile app for Android users, making it accessible across different platforms.
For users concerned about privacy and data security, Razer Cortex has a strict privacy policy in place to protect user information. It does not collect personal data without consent and ensures that user information is kept confidential.
Comparing to The Competition and Final Assessment
When comparing Razer Cortex to its competition, it stands out for its user-friendly interface and comprehensive optimization features. Unlike other similar tools, Razer Cortex offers a wide range of customization options that allow users to tailor their settings to their specific needs.
Additionally, Razer Cortex excels in boosting FPS (frames per second) and optimizing performance for both gaming and general computer usage. Its machine learning algorithms continuously adapt to user behavior, ensuring optimal performance over time.
In a final assessment, Razer Cortex proves to be a valuable tool for gamers and everyday users alike. Its ability to enhance performance, increase FPS, and streamline processes make it a top choice in the market.
F.A.Q.
Is Razer Cortex useful?
Razer Cortex is definitely useful for gamers.
Does Razer Cortex improve FPS?
Razer Cortex can improve FPS by allowing users to set their desired FPS and automatically adjusting their game’s graphic settings to match that FPS count.
Do FPS boosters actually work?
FPS boosters can be effective in increasing frame rates and improving graphics quality in gaming, resulting in a smoother gaming experience.
What does Razer Cortex system Clean do?
Razer Cortex System Clean automatically scans and removes junk files to free up disk space, along with two additional functions for a comprehensive system tune-up.