
Troubleshoot and resolve connectivity issues with ease as we delve into the world of fixing unidentified network and no internet access problems in Windows 11/10. Discover effective solutions to regain seamless online connectivity on your Windows device in no time.
Causes of the Unidentified Network Problem
1. Network Glitches: Network errors or glitches can cause the “Unidentified Network” problem.
2. Hardware Issues: Faulty network adapter or Ethernet cable can also lead to this issue.
3. Incorrect Network Settings: Incorrect network settings on your computer or router can prevent proper network identification.
4. Outdated Network Adapter Driver: An outdated or incompatible network adapter driver can cause network connectivity problems.
5. Airplane Mode Enabled: Check if Airplane Mode is enabled on your computer, as it can disable network access.
6. Privacy Settings: Privacy settings and data processing options on your computer can sometimes interfere with network access.
7. Command Prompt Errors: Command prompt errors or misconfigurations can also contribute to the unidentified network problem.
To fix the Unidentified Network problem:
1. Restart Your Computer: Restarting your computer can resolve temporary network glitches.
2. Check Network Adapter: Make sure the network adapter is properly connected and functioning.
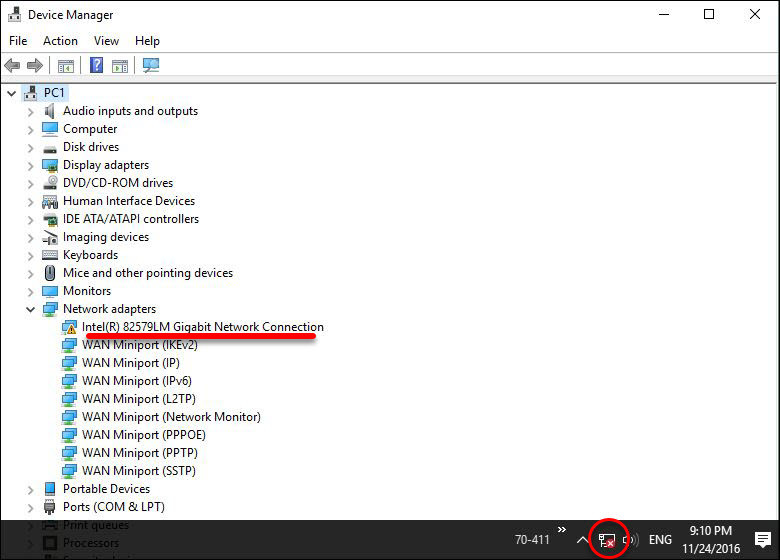
3. Update Network Adapter Driver: Update the network adapter driver to the latest version. Step-by-step guide: Go to Device Manager, expand “Network adapters,” right-click on the adapter, and select “Update driver.”
4. Reset Network Settings: Reset network settings on your computer to default. Step-by-step guide: Go to Settings > Network & Internet > Status > Network reset.
5. Disable Airplane Mode: Turn off Airplane Mode if it’s enabled.
6. Adjust Privacy Settings: Review and adjust privacy settings on your computer to ensure they are not blocking network access.
7. Run Network Troubleshooter: Use the built-in network troubleshooter tool to automatically detect and fix network issues. Step-by-step guide: Go to Settings > Network & Internet > Status > Network troubleshooter.
Follow these troubleshooting steps to fix the unidentified network problem and regain internet access on your Windows computer.
Fixing the Unidentified Network Issue in Windows
1. Check your hardware connections: Ensure that your Ethernet cable is securely plugged into both your computer and your router or modem.
2. Reset your network adapter: Press the Windows key + X, then select “Device Manager.” Expand the “Network adapters” section, right-click on your network adapter, and select “Uninstall device.” Restart your computer, and Windows will reinstall the driver automatically.
3. Disable IPv6: Press the Windows key + X, then select “Network Connections.” Right-click on your network connection, select “Properties,” and uncheck the box next to “Internet Protocol Version 6 (TCP/IPv6).”
4. Flush your DNS cache: Open Command Prompt as an administrator, type “ipconfig /flushdns,” and press Enter.
5. Restart your router or modem: Unplug the power from your router or modem, wait 30 seconds, then plug it back in and let it reboot.
Remember, if these steps don’t resolve the issue, it may be a more complex network error that requires further troubleshooting.
Checking Hardware for Network Issues
- Ensure all cables are securely connected.
- Restart your modem and router.
- Update the network adapter driver.
- Disable and re-enable the network adapter.
- Check for any physical damage to the network adapter.
- Disable any VPN or proxy settings.

- Reset TCP/IP stack.
- Run the network troubleshooter.
- Disable firewall and antivirus temporarily for testing.
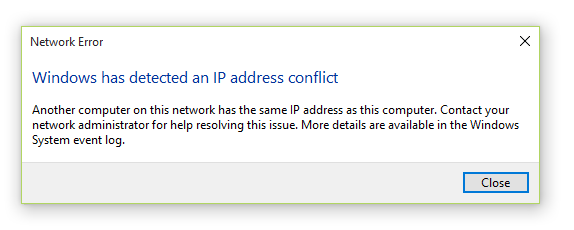
- Check for any IP address conflicts.

- Try connecting to a different network.
- Perform a system restore to a previous working state.
python

import subprocess
def get_available_networks():
try:
result = subprocess.run(['netsh', 'wlan', 'show', 'networks'], capture_output=True, text=True)
output = result.stdout.strip()
print(output)
except subprocess.CalledProcessError as e:
print(f"Error occurred: {e}")
get_available_networks()
This code utilizes the `netsh` command-line tool in Windows to retrieve the available networks. It executes the command `netsh wlan show networks` and captures the output. Finally, it prints the output to the console.
Please note that this is a basic example, and without further details on the specific functionalities you desire, it is challenging to provide a more comprehensive solution.
Restarting Computer and Router
Restarting your computer and router can often resolve network issues such as an unidentified network or no internet access in Windows 11/10.
To do this, follow these steps:
1. First, save any important work you have open and close all programs.
2. Shut down your computer by clicking on the Start menu, selecting Power, and choosing Shut down.
3. Once your computer is fully powered off, unplug the power cable from your router.
4. Wait for about 30 seconds, then plug the power cable back into the router.
5. Wait for the router to fully restart and reconnect to the internet.
6. Finally, turn on your computer by pressing the power button.
By restarting both your computer and router, you can often fix network errors and restore internet connectivity. If the problem persists, you may need to try other troubleshooting steps or contact your internet service provider for further assistance.
Turning off Airplane Mode
To turn off Airplane Mode in Windows 11/10 and resolve the issue of an unidentified network and no internet access, follow these steps:
1. Open the Start menu and click on the Settings icon.
2. In the Settings window, select the Network & Internet option.
3. On the left side, choose the Airplane Mode tab.
4. Toggle the Airplane Mode switch to the off position.
With Airplane Mode turned off, your network connection should be restored, and you should have internet access again. If the issue persists, you can try other troubleshooting steps such as restarting your router or resetting your network settings.
Remember to check if your Ethernet connection is properly plugged in and if your network adapter is functioning correctly. Update your network drivers if necessary.
For more detailed instructions and troubleshooting solutions, you can visit the Windows support page or consult the Windows user guide.
Updating Network Adapter Driver
Updating your network adapter driver can help fix issues with an unidentified network and no internet access on Windows 11/10. Follow these step-by-step instructions to update your driver:
1. Press the Windows key + X and select “Device Manager.”
2. Expand the “Network adapters” category.
3. Right-click on your network adapter and select “Update driver.”
4. Choose “Search automatically for updated driver software.”
5. Wait for Windows to search and install the latest driver.
6. Restart your computer to apply the changes.
Updating your network adapter driver can resolve network errors and connectivity issues. It ensures that your computer can identify the network and access the internet properly. If you continue to experience problems, consider troubleshooting other factors such as network cables, router settings, or contacting your network administrator for further assistance.
Releasing and Renewing IP Address
To release and renew your IP address in Windows 11/10, follow these steps:
1. Press the Windows key + X on your keyboard and select “Command Prompt (Admin)” or “Windows PowerShell (Admin)”.
2. In the command prompt window, type ipconfig /release and press Enter. This will release your current IP address.
3. Next, type ipconfig /renew and press Enter. This will renew your IP address and establish a new connection.
4. Once the process is complete, close the command prompt window and check if the unidentified network and no internet access issue is resolved.
By releasing and renewing your IP address, you can troubleshoot network errors and resolve connectivity issues. This simple solution can help you regain internet access on your Windows 11/10 computer.
Note: These steps are applicable for Windows 11/10, but similar steps can be followed for other Windows versions like Windows 8, Windows 7, and Windows Vista. Additionally, make sure you have a working Ethernet connection and cable if you are using a wired network.
Using the “Diagnose This Connection” Tool
1. Press the Windows key + R to open the Run dialog box.
2. Type “ncpa.cpl” and press Enter to open the Network Connections window.
3. Right-click on the network connection with the unidentified network error and no internet access.
4. Select “Diagnose” from the context menu.
5. Follow the troubleshooting steps provided by the “Diagnose This Connection” tool.
6. The tool will automatically detect and resolve common network issues.
7. If the tool is unable to fix the problem, it will provide suggestions for further troubleshooting.
8. Check your network cables and ensure they are properly connected.
9. Restart your router and modem.
10. Update your network drivers.
11. If the issue persists, seek further assistance from Microsoft’s support page or contact your network provider.
Remember to provide as much information as possible about the problem when seeking support to expedite the troubleshooting process.
Changing DNS Server
To change the DNS server in Windows 11/10 and fix unidentified network and no internet access issues, follow these steps:
1. Press the Windows key + R to open the Run dialog box.
2. Type “ncpa.cpl” and press Enter to open the Network Connections window.
3. Right-click on the network connection you’re using and select Properties.
4. In the Properties window, select Internet Protocol Version 4 (TCP/IPv4) and click Properties.
5. In the next window, select “Use the following DNS server addresses.”
6. Enter the preferred DNS server address in the Preferred DNS server field and the alternate DNS server address in the Alternate DNS server field.
7. Click OK to save the changes.
By changing the DNS server, you can resolve network connectivity issues and regain internet access. Make sure to enter the correct DNS server addresses provided by your internet service provider or a reliable source.
For more troubleshooting steps and detailed instructions, visit the Microsoft support website or contact our partners for further assistance.
Disabling Fast Startup
To fix the issue of “Unidentified Network” and “No Internet Access” in Windows 11/10, you can try disabling Fast Startup. Here’s a step-by-step guide:
1. Press the Windows key + X and select “Power Options” from the menu.
2. In the Power Options window, click on “Choose what the power buttons do” on the left side.
3. Click on “Change settings that are currently unavailable.”
4. Scroll down to the “Shutdown settings” section and uncheck the box that says “Turn on fast startup (recommended).”
5. Click on “Save changes” to apply the settings.
Disabling Fast Startup can help resolve network connectivity issues by performing a full shutdown and ensuring a fresh start for network components. Give this troubleshooting step a try if you’re experiencing problems with your internet connection.
Running the Network Troubleshooter
1. Press the Windows key + R to open the Run dialog box.
2. Type “ms-settings:network-status” and hit Enter to open the Network & Internet settings.
3. Scroll down and click on “Network Troubleshooter” under the Advanced network settings.
4. Click on “Run the troubleshooter” and wait for the process to complete.
5. The troubleshooter will automatically detect and fix any network-related problems.
6. If any issues are found, follow the on-screen instructions to resolve them.
7. Once the troubleshooting is complete, check if the unidentified network and no internet access problem is resolved.
Remember to restart your computer after completing the troubleshooting steps. This process can help identify and resolve common network issues, ensuring a stable and reliable internet connection.
Testing the Internet Connection
If you’re experiencing an unidentified network and no internet access issue on your Windows 11 or Windows 10 device, you can troubleshoot the problem by testing your internet connection. Here’s a step-by-step guide to help you:
1. Check your physical connection: Ensure that your network ethernet cable is securely connected to both your computer and the router.
2. Restart your router and modem: Turn off your router and modem, wait for a few seconds, and then turn them back on. This can often resolve connectivity issues.
3. Reset your network settings: Press the Windows key + X, and select “Command Prompt (Admin)” from the menu. In the command prompt window, type “netsh winsock reset” and press Enter. Restart your computer after the process completes.
4. Update your network drivers: Visit the manufacturer’s website for your network adapter and download the latest drivers for your specific Windows version. Install the drivers and restart your computer.
5. Disable IPv6: Press the Windows key + X, and select “Network Connections.” Right-click on your active network connection, select “Properties,” and uncheck the “Internet Protocol Version 6 (TCP/IPv6)” box. Click OK.
Testing your internet connection can help identify and resolve the unidentified network and no internet access issue. If the problem persists, you may need to explore further troubleshooting steps or seek assistance from our partners or community forums.
Resolving Router or Modem Issues
- Restart your router or modem to refresh the connection.
- Check the power and connection cables to ensure they are properly plugged in.
- Reset your router or modem to its default settings if necessary.
- Verify if the network adapter is enabled and functioning correctly.
- Update the firmware of your router or modem to the latest version.
- Temporarily disable any firewalls or antivirus software that may be blocking the connection.
- Perform a network reset to clear any network configuration issues.
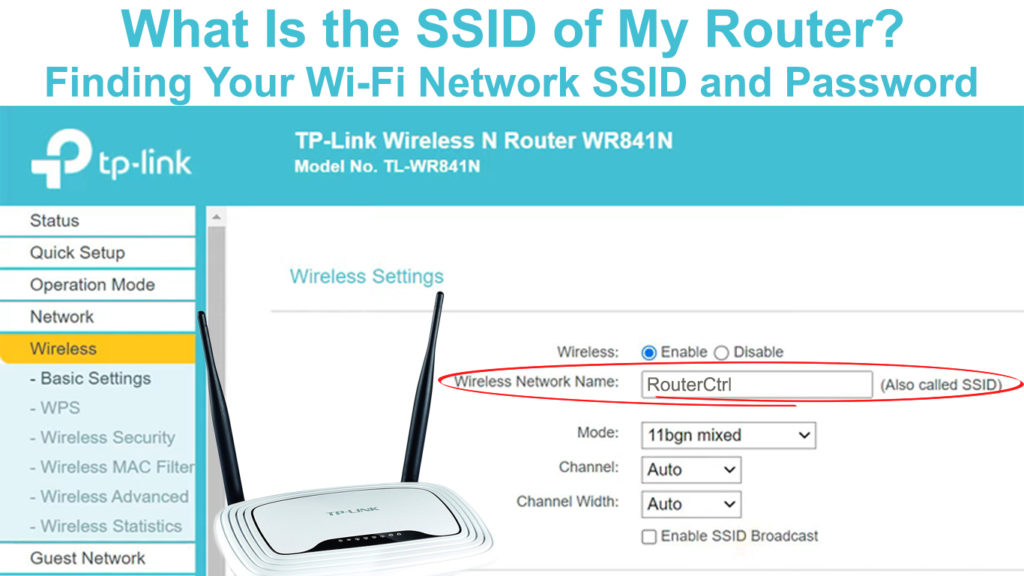
- Check if the router or modem SSID (network name) is being broadcasted.
- Change the wireless channel of your router to avoid interference.
- Update the network drivers on your computer.
- Disable IPv6 if it is causing conflicts.
- Run the Windows Network Troubleshooter to automatically detect and fix common network issues.
- Consult your Internet Service Provider (ISP) for any known outages or configuration problems.
Troubleshooting Network Adapter Problems
If you’re experiencing issues with your network adapter on Windows 11 or Windows 10, follow these troubleshooting steps to fix the problem.
1. Check physical connections: Ensure that your network ethernet cable is securely connected to both your computer and router or modem.
2. Restart your devices: Power cycle your computer, router, and modem. Turn them off, wait for a few seconds, then turn them back on.
3. Update network adapter drivers: Go to the manufacturer’s website or use Windows Update to download and install the latest drivers for your network adapter.
4. Reset TCP/IP stack: Open Command Prompt as an administrator and type “netsh int ip reset” command. Restart your computer after the process completes.
5. Disable and re-enable the network adapter: Right-click on the network adapter in Device Manager, select “Disable,” wait for a few seconds, then select “Enable.”
6. Run the Network Troubleshooter: Open Settings, go to “Network & Internet,” select “Status,” and click on “Network Troubleshooter” to automatically diagnose and fix common network issues.
7. Check for antivirus or firewall interference: Temporarily disable your antivirus or firewall software to see if it’s causing the problem.
Remember, these troubleshooting steps can help resolve common network adapter problems. If the issue persists, consider seeking further assistance.