Summary
- Dual-channel RAM installation doubles memory bandwidth for increased performance
- Proper installation involves placing identical memory modules in corresponding colored slots on the motherboard
- Verify dual-channel configuration in BIOS or using system information tools like CPU-Z
- Troubleshoot detection issues by checking compatibility, reseating RAM sticks, updating BIOS, and testing individual sticks
In this article, I will discuss the correct way to install dual channel RAM in your computer system.
Understanding Dual-Channel Operation and Its Impact on Performance
Dual-channel operation is a memory architecture that allows for increased performance by utilizing two memory modules simultaneously. This setup effectively doubles the memory bandwidth compared to a single-channel configuration, resulting in faster data transfer rates and improved overall system performance.
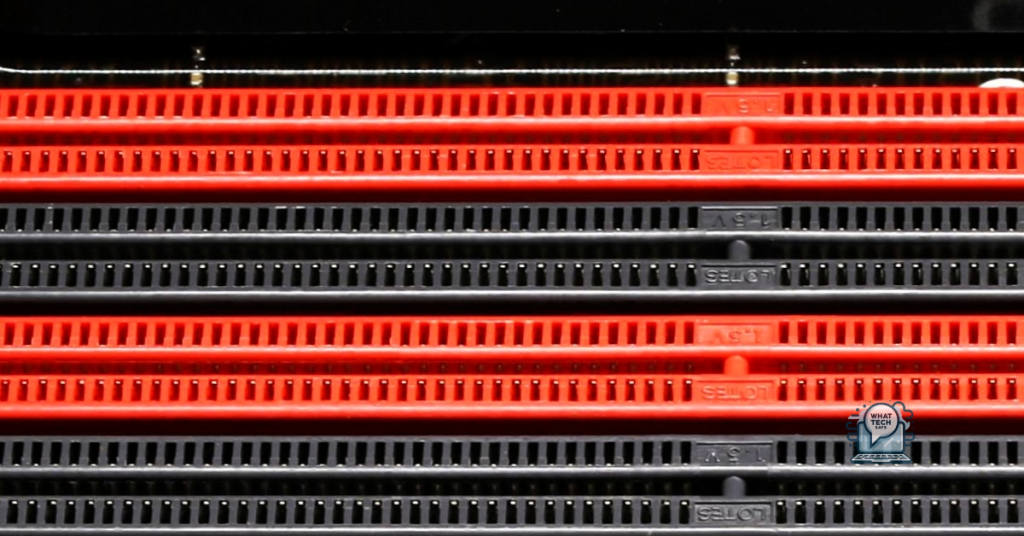
When installing dual-channel RAM correctly, it is crucial to ensure that the memory modules are placed in the correct slots on the motherboard. Consult your motherboard manual to identify the optimal configuration for dual-channel operation. Typically, the memory modules should be installed in identical pairs, such as two 8GB DIMMs, in the corresponding colored slots on the motherboard.
Serial presence detect (SPD) technology in modern DDR4 SDRAM modules allows the system to automatically detect and configure the memory settings for optimal performance. However, it is still essential to verify in the BIOS that the system recognizes the memory modules in dual-channel mode.
Proper installation of dual-channel RAM can significantly impact the system’s performance, especially in tasks that rely heavily on memory bandwidth, such as gaming, video editing, and multitasking. By maximizing memory bandwidth through dual-channel operation, you can experience smoother performance and reduced latency.
In some cases, improper installation of dual-channel RAM can result in the system failing to boot or experiencing stability issues. Ensure that the memory modules are securely seated in the DIMM slots, and the retention clips are properly engaged. If you encounter any issues, refer to the motherboard manual for troubleshooting steps.
Major hardware manufacturers like Corsair, Asus, and Cooler Master offer a wide range of dual-channel RAM kits designed for optimal compatibility and performance. Choose a reputable brand and ensure that the memory modules are compatible with your motherboard chipset and CPU. Additionally, consider investing in a quality heat sink or cooler to prevent overheating and maintain stable performance.
Methods to Verify Dual-Channel Configuration
- Open System Information by searching in the Start menu
- Click on the “Memory” tab
- Look for the “Channel #” information to verify dual-channel configuration
- Download and install CPU-Z from the official website
- Open CPU-Z
- Go to the “Memory” tab
- Check the “Channels #” information to verify dual-channel configuration
- Locate the motherboard manual

- Find the section related to memory configuration
- Look for information on dual-channel memory setup
Method 1: Check System Information
Method 2: Use CPU-Z
Method 3: Consult Motherboard Manual
Ensuring Compatibility and Correct Installation
To ensure compatibility and correct installation of Dual Channel RAM, it is important to follow specific steps.
First, make sure your motherboard supports Dual Channel memory by checking the specifications in the manual or online.
Next, insert the RAM sticks into the correct DIMM slots on the motherboard. Refer to the motherboard manual to identify which slots are designated for Dual Channel operation.
It is crucial to use identical RAM sticks for optimal performance. Mixing different brands or speeds may cause compatibility issues.
Before installing the RAM, make sure to ground yourself to prevent any static electricity damage.
After inserting the RAM sticks, secure them in place with the screws or clips provided.
Once the RAM is installed correctly, power on the computer and enter the BIOS settings to verify that the system recognizes the new RAM configuration.
Make sure to save any changes made in the BIOS before exiting.
Finally, boot up the operating system and check the system properties to ensure that the correct amount of RAM is detected.
If you encounter any issues during installation or boot-up, refer to the motherboard manual or seek assistance from online forums such as Reddit for troubleshooting tips.
Troubleshooting: When Dual-Channel Is Not Detected
If your computer is not detecting your dual-channel RAM, there may be a few troubleshooting steps you can take to resolve the issue.
First, ensure that both RAM sticks are properly seated in the correct slots on your motherboard. Make sure to check your motherboard’s manual for the recommended configuration for dual-channel memory installation. Sometimes, simply reseating the RAM sticks can resolve detection issues.
Next, check to see if the RAM sticks are compatible with your motherboard. Consult your motherboard’s specifications and make sure that the RAM sticks meet the required standards. If they are not compatible, you may need to purchase new RAM sticks.
If the RAM sticks are compatible and properly seated, you may need to update your motherboard’s BIOS. Visit the manufacturer’s website and download the latest BIOS version for your motherboard. Follow the instructions provided to update the BIOS, as this may resolve any compatibility issues.
It’s also possible that one of the RAM sticks is faulty. Try testing each RAM stick individually in different slots to determine if one of them is causing the issue. If one of the RAM sticks is indeed faulty, you may need to replace it.
If all else fails, you may want to seek help from a professional or consult online forums for further assistance. Reddit’s computer hardware community is a great place to ask for advice and troubleshooting tips. Remember to provide as much information as possible about your system and the issue you are experiencing to receive accurate help.
F.A.Qs
How do I enable dual channel RAM?
To enable dual channel RAM, you need to install the modules in alternate slots on your motherboard. For example, if there are 4 slots, place the first module in the first slot and the second module in the third slot. Make sure to turn off the PC and unplug all connections before installing the RAM.
Why is my 2nd RAM not working?
Your 2nd RAM may not be working because it is not properly installed. Try removing and re-inserting the RAM stick firmly into its slot, ensuring it clicks into place securely.
How do I know if my RAM is working in dual channel?
To know if your RAM is working in dual channel, you can use CPU-Z. Launch the program, go to the “Memory” tab, and check the “Channel #” to see your RAM channel configuration. CPU-Z also accurately reports the RAM’s frequency.
Why my RAM slot is not working?
My RAM slot is not working because there may be dust or debris causing connection issues. It is important to clean the RAM slot with compressed air or a soft brush. Additionally, updating the BIOS on the laptop may also help resolve the issue.

